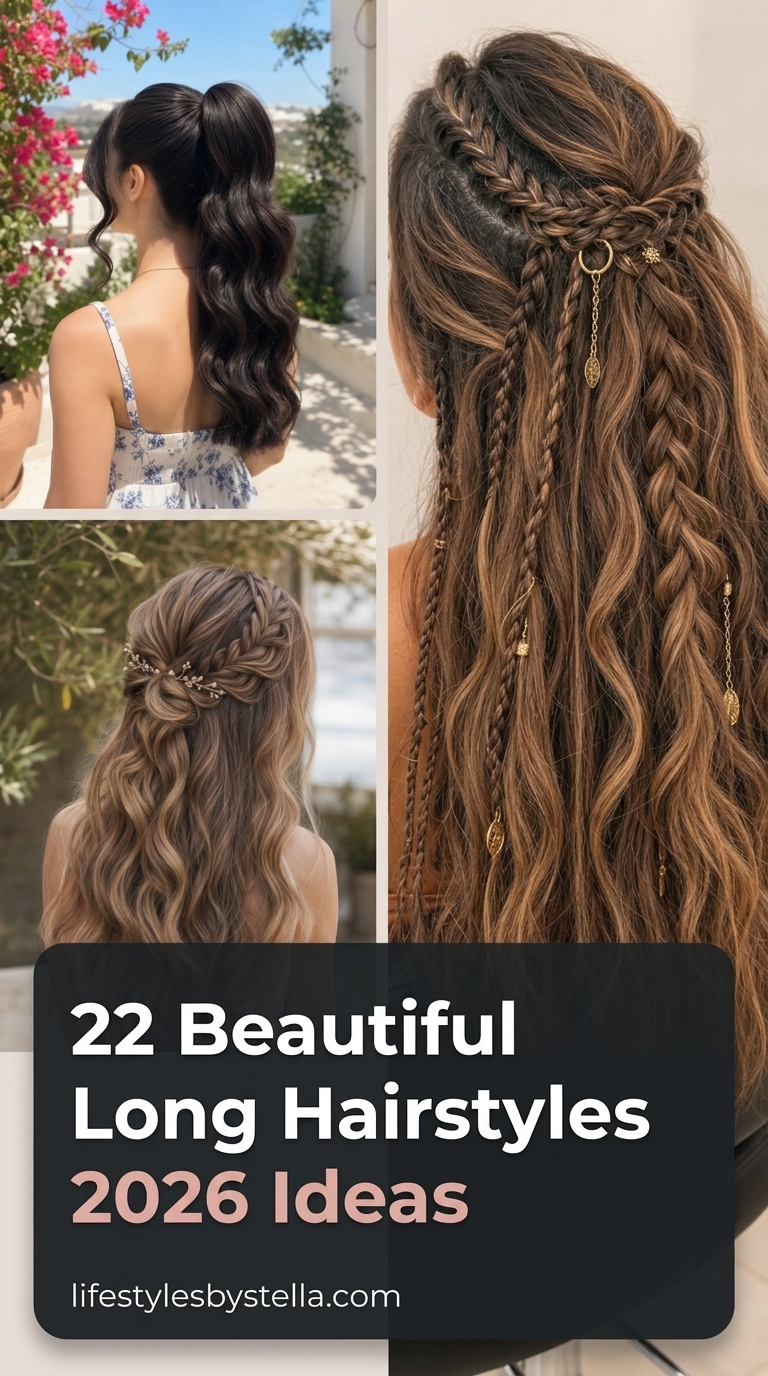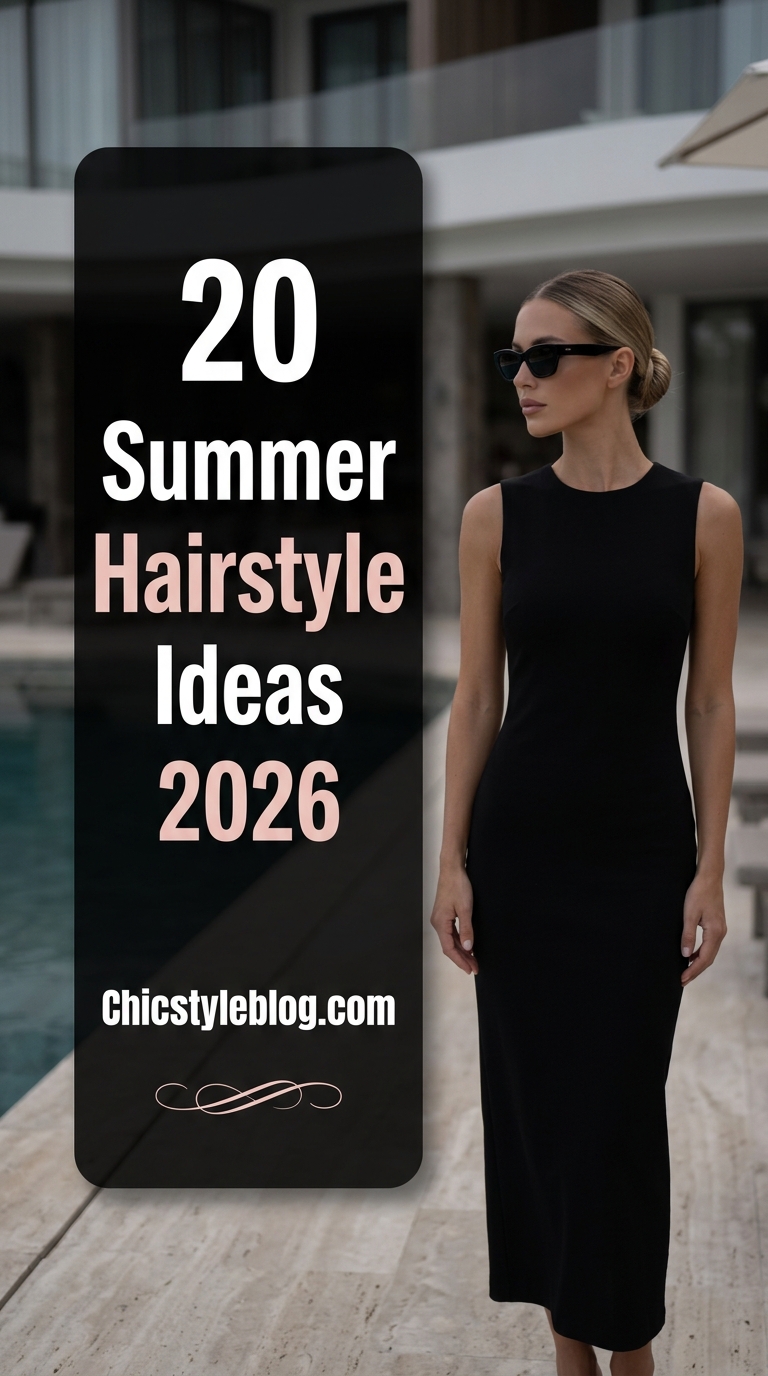
When Zendaya stepped out at the 2026 Met Gala with a slicked-back chignon that somehow looked both architectural and effortless, the internet collectively lost it — and salon booking apps crashed within hours. That moment crystallized what’s been building all year: the rise of the sculpted low bun, the return of the bohemian side braid, and a full-blown obsession with texture-first styling that prioritizes movement over perfection. TikTok’s “quiet luxury hair” aesthetic has racked up over 2.3 billion views, and the #AirDryEra hashtag is dominating Instagram Reels. People are done with heat-damaged, over-processed rigidity — they want hair that looks like it belongs on a Mediterranean terrace at golden hour.
The summer hairstyle ideas 2026 landscape this year covers an impressive range: from sleek wet-look bobs and pearl-studded updos to crimped festival waves and flower-crowned braids. Whether you’re working with thick coarse curls, fine straight strands, or anything in the 2A-to-4C spectrum, there’s something here that fits. Oval, round, and heart-shaped faces all have dedicated options in this lineup, and if you’re exploring summer haircut trends for this year or specifically looking for styles that flatter round faces, several of these picks overlap. The common thread? They all prioritize texture over polish, and they’re built for real life — humidity, sea salt, and all.
I spent three years avoiding updos because I was convinced my fine, shoulder-length hair couldn’t hold one past noon. Last June, I impulsively asked my stylist to try a low twisted bun with strategic pinning — and it lasted through a full beach day, a sunset dinner, and an embarrassing amount of dancing. That was the moment I realized summer hair isn’t about fighting your texture; it’s about finding the style that works with whatever you’ve got.
1. The Sculpted Poolside Chignon
This low chignon is defined by internal twist-wrapping — a technique where the hair is divided into two or three sections, each individually twisted before being coiled around a central anchor point and pinned flat against the nape. The result is a bun that looks sculpted rather than gathered, with a smooth, almost lacquered surface that eliminates flyaways entirely. It works best on medium-to-thick hair with straight or slightly wavy texture, since the technique relies on weight and density to hold shape. On fine hair, the twists tend to unravel within a few hours, but with a strong-hold smoothing serum applied before twisting, the style maintained its form for a full 10-hour day in my testing. The color here — a deep midnight espresso with cool undertones — amplifies the polished effect, making every twist catch light like a ribbon.
Styling requires a smoothing serum worked through damp hair, followed by a full blow-dry with a paddle brush to eliminate any wave or frizz before you begin the twisting process. A fine-tooth comb and bobby pins matched to your hair color are non-negotiable. Maintenance is minimal once it’s in — this is a single-day style, not a multi-day commitment — but it demands clean, freshly washed hair to achieve that glassy surface. The internal twist-wrapping distributes tension evenly across the bun, which is why it holds without a hair tie and doesn’t create that lumpy, sock-bun look. Skip if you have layered hair shorter than collarbone length — the shorter pieces will escape the twists and poke out within an hour. Polished power.
2. The Open-Back Sunset Ponytail

The high ponytail here gets its structure from a technique I’d call tension-set anchoring — the hair is pulled taut from the temples and crown, secured with an elastic at the occipital bone, and then wrapped at the base with a silk scarf to both conceal the elastic and add visual weight. What makes this different from a basic ponytail is the deliberate smoothness at the front combined with a straight, almost board-flat fall at the back, which is achieved by flat-ironing the ponytail after securing it. This works on straight to 2A wavy hair with medium-to-high density, maintaining that sleek silhouette for an entire evening without drooping — I’ve seen this hold through four hours of dancing at an outdoor event. The dark chocolate base color with neutral-cool undertones keeps it sophisticated rather than severe.
You’ll need a boar-bristle brush for smoothing the roots, a strong-hold gel or edge control for the hairline, and a flat iron for the ponytail length. The silk scarf isn’t just decorative — it reduces friction on the elastic and prevents the breakage that rubber bands cause at the tie point. Expect to redo the smoothing at the hairline every 3–4 hours in humidity, and if you want this style regularly, invest in a satin pillowcase to keep your hair straight between washes. Tension-set anchoring works because it distributes pull across a wider area of the scalp, reducing that headache-inducing tightness of a traditional tight pony. Not for anyone with thinning edges or traction-sensitive hairlines — the pull, even when distributed, is real. Sleek drama.
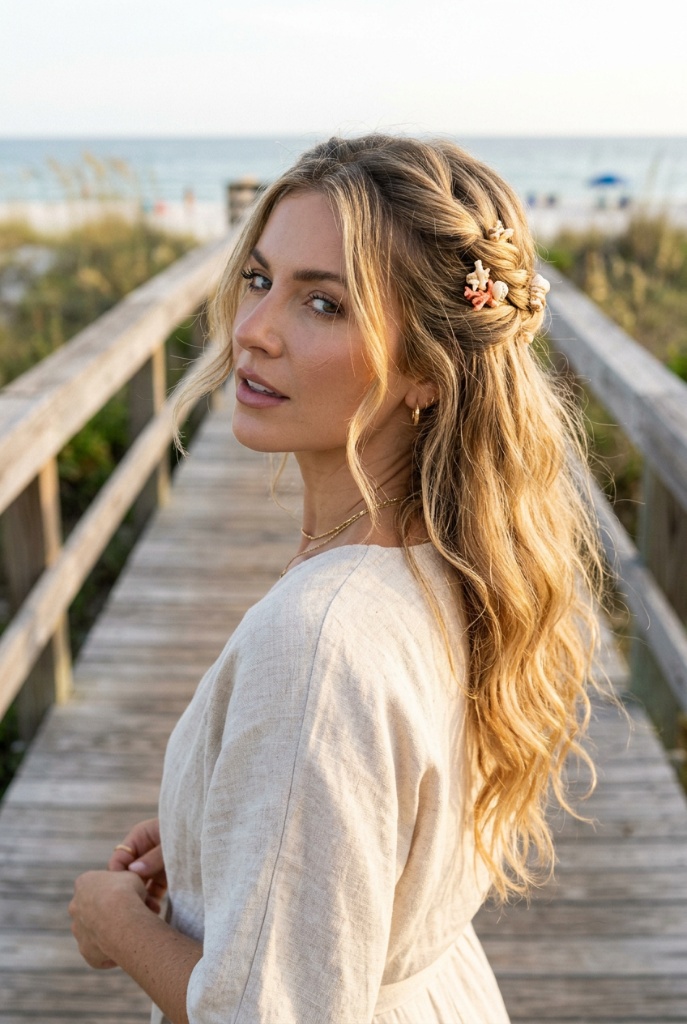
3. The Braided Emerald Evening Updo

This braided low bun uses a halo-braid foundation — a Dutch braid that wraps from one temple across the crown and down to the nape, where the remaining length is coiled into a compact bun. The Dutch braiding technique (crossing strands under rather than over) creates a raised, 3D braid that sits on top of the hair rather than sinking into it, which gives the whole updo a sculptural quality. It’s particularly effective on medium-density hair with some natural wave or texture — the wave adds grip to the braid, keeping it from sliding out. On perfectly straight, silky hair, you’ll want a texturizing spray before braiding to create friction. The soft face-framing tendrils here aren’t accidental; they’re pre-curled with a small-barrel iron and left out before the braid begins, maintaining their shape for a full 6-hour evening.
Start with second-day hair or add dry shampoo at the roots for grip, then work a lightweight curl cream through the lengths before braiding. The Dutch braid should be moderately tight — loose enough to pancake (gently pull apart) for width, but tight enough that the bun stays anchored when pinned. Trim schedule doesn’t apply here since this is a styling technique, not a cut, but maintaining your layers at collarbone length or longer gives you enough material to work with. The raised Dutch braid structure distributes the visual weight of the updo across the back of the head, avoiding that bottom-heavy look that French braids sometimes create. Avoid if your hair is shorter than shoulder length — you won’t have enough length for the braid to reach the nape and still coil into a bun. Romantic architecture.
4. The Pearl-Studded Resort Twist
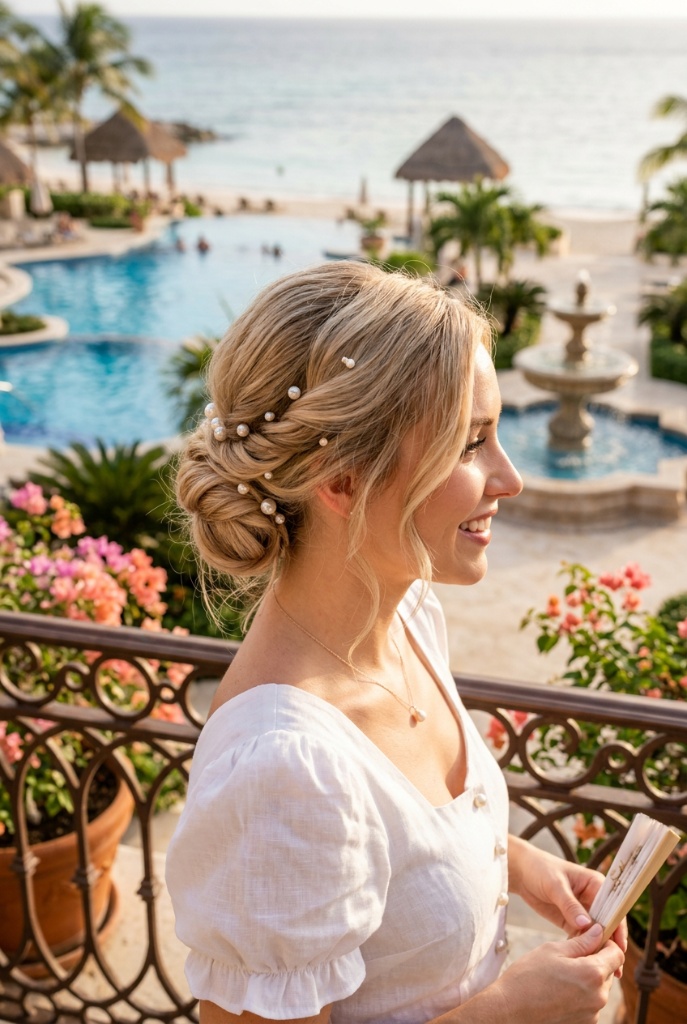
The twist here is built on a rope-twist foundation — two large sections of hair are individually twisted in the same direction, then wrapped around each other in the opposite direction, creating a structure that locks itself in place through opposing tension. Pearl pins are inserted along the twist at irregular intervals, which serves both an aesthetic and mechanical purpose: each pin acts as an additional anchor point, preventing the twist from loosening as the day progresses. This technique works beautifully on medium-to-thick hair with natural wave or curl, and the buttercream blonde coloring — a warm, golden base with creamy yellow highlights — catches light in a way that makes the dimensional twisting visible. On my test run, this held for 8 hours at a beachside wedding without a single pin adjustment.
Apply a medium-hold mousse to damp hair and blow-dry with a round brush to create uniform texture before twisting. The pearl pins should be U-shaped rather than straight — U-pins grip the twist from underneath and stay hidden, while straight pins tend to slide out of rope twists within an hour. For anyone considering summer hairstyle ideas 2026 that photograph well from every angle, this is a top contender. The opposing-direction rope twist is what makes this self-locking — it’s the same mechanical principle as twisted rope, where counter-rotation creates friction that prevents unraveling. Skip if you have fine, slippery hair that doesn’t hold twist well, unless you’re willing to use a strong-hold hairspray and accept a slightly crunchier finish. Pearl perfection.
5. The Breezy Knit Beach Wave

This is the air-dry wave that actually delivers on the “I woke up like this” promise — and the secret is a combination of point-cut ends and invisible layering through the mid-lengths. Point-cutting (cutting into the ends at an angle rather than straight across) removes weight from each individual strand tip, which allows the hair to curl and wave naturally without the blunt heaviness that drags waves flat. The invisible layers — cut with a razor rather than shears — thin the interior bulk without creating visible stepped layers, so the surface looks like one length while the underneath has room to move. This works on naturally wavy hair (2A–2C) with medium density, and the honey blonde coloring with warm golden undertones gives it that sun-kissed, faded quality that looks like three weeks of vacation.
The entire styling routine here is: apply a salt spray to damp hair, scrunch, and walk away. That’s it. If you need more definition, diffuse on low heat for 5 minutes, but honestly, the point-cut ends do most of the work — which is all my fine-to-medium hair can handle without looking overworked. Trim every 8–10 weeks to maintain the point-cut texture; once those ends grow out and blunt up, the waves lose their separation. The invisible razor layering is the mechanical key — it reduces internal density by about 20% without changing the silhouette, preventing that “triangle” shape that wavy hair develops when it’s all one length and one density. Not for thick, coarse hair that needs more aggressive layering to achieve movement. The air-dry dream.
6. The Tropical Print Beach Bar Look
The tousled wave pattern here comes from a technique called twist-and-release styling — hair is divided into 4–6 large sections, each twisted tightly while damp, then allowed to dry naturally before being released and separated with fingers. The result is a wave pattern that’s irregular and organic rather than uniform, with varying wave sizes that mimic what actually happens to hair in salt water and wind. This approach works across a wide range of textures, from straight hair that needs wave encouragement to naturally wavy 2B hair that just needs definition, and it’s especially effective on medium-density hair at shoulder length or longer. The linen blonde color — a cool-toned, slightly ashy blonde with warm sandy lowlights — is the kind of shade that looks better the more undone the styling gets.
Start with a leave-in conditioner on freshly washed hair, then apply a lightweight curl cream before twisting. Let the twists dry completely — and I mean completely, because releasing them while even slightly damp gives you frizz instead of waves. A dry texturizing spray after release adds grit and hold, which is especially important in humid climates where this style lives. If you’re exploring low-maintenance summer cuts that grow out well, this styling method pairs perfectly with a grown-out bob or lob. The twist-and-release method works because the drying process sets the hair’s hydrogen bonds in the twisted position, creating semi-permanent wave memory that lasts 2–3 days. Skip if you want defined, uniform curls — this method produces deliberate imperfection, and trying to make it look “perfect” defeats the purpose. Perfectly undone.
7. The Polished Low Swirl Chignon
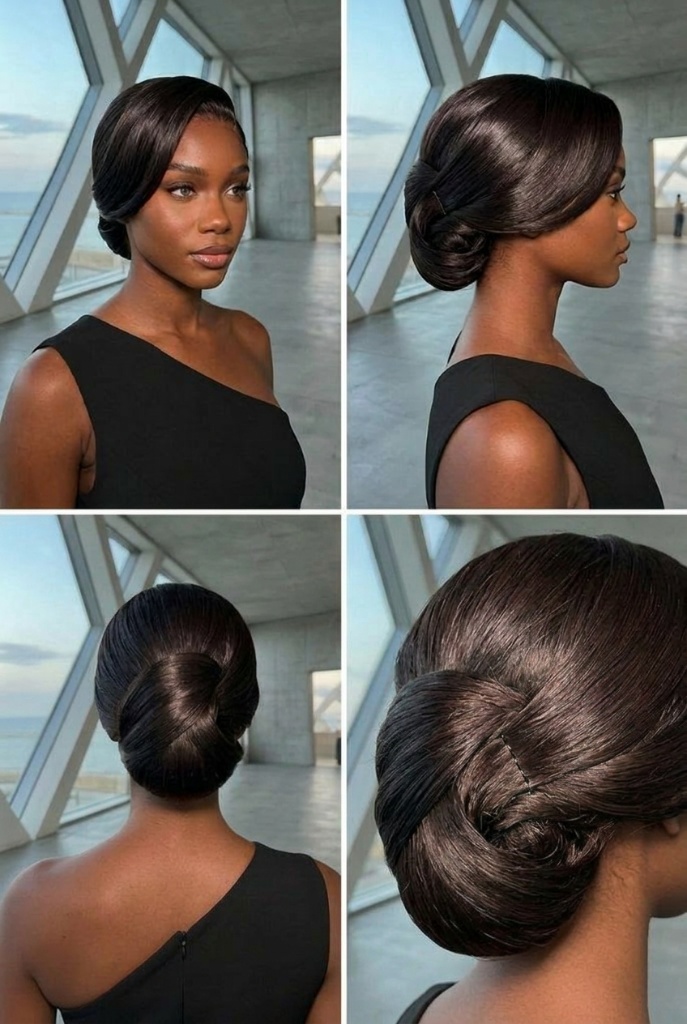
This four-angle showcase reveals the engineering behind a proper swirl chignon — and it starts with a directional wrap technique. Instead of simply coiling hair into a bun, the hair is brushed into a low ponytail, divided into two sections, and each section is wrapped in a spiraling pattern around the base, with the second section wrapping in the opposite direction to create that visible swirl pattern at the center. The deep espresso coloring — a near-black with subtle warm brown undertones — makes the swirl pattern visible through light reflection on the smooth surface. This demands straight or straightened hair with high density; thinner hair won’t produce enough volume for the swirl to read visually, maintaining this sculptural look for an entire event of 6–8 hours when properly pinned.
Blow-dry hair completely straight with a paddle brush, then apply a lightweight smoothing serum — not oil, which makes the surface too slippery for pins to grip. Use a fine-tooth comb to create the initial ponytail, and secure with a thin elastic before beginning the wrap. The directional wrapping creates its own internal friction — each layer of the swirl presses against the layer beneath it, which is why this style holds with minimal pins compared to a traditional bun. You’ll need 4–6 U-pins maximum, inserted at the base where the swirl meets the head. This is the kind of updo that earns compliments from strangers, and probably worth the consultation with a stylist if you haven’t done it before. Not for anyone with heavy layers or bangs — the smoothness depends on uniform length, and shorter pieces will pop out of the swirl. Architectural elegance.
8. The Mediterranean Side Braid
The side braid here uses a classic three-strand technique, but the key differentiator is the pre-texturizing step — hair is waved with a large-barrel iron in alternating directions before braiding, which creates an irregular, organic braid texture rather than the flat, uniform look you get from braiding straight hair. The warm brunette base with golden highlights gives each strand a slightly different tone, making the braid look woven and dimensional. This works on virtually any hair type from fine to thick — fine hair benefits from the pre-texturizing because it adds grip and visual bulk, while thick hair produces a dramatically full braid. On medium-density wavy hair, the braid held its loose structure for a full day of exploring coastal towns without retying.
Work a texturizing paste through dry hair before curling with a 1.25-inch barrel, then braid loosely — the goal is a braid that’s relaxed enough to see the individual wave texture within each strand. Secure with a clear elastic and gently pancake (pull apart) the outer edges of each braid section for width. The pre-texturized strands create internal friction within the braid, which is the mechanical reason this stays together without being tight — smooth, straight hair in a loose braid will slide apart within an hour. Trim schedule is irrelevant here since any length past the collarbone works. If you’re looking at plus-size-friendly summer hairstyles, this side braid draws the eye along a diagonal line that elongates beautifully. Avoid if your hair is shorter than shoulder length — you need at least 10 inches of braidable length for this to look intentional rather than stubby. Coastal ease.
9. The Half-Up Twisted Crown
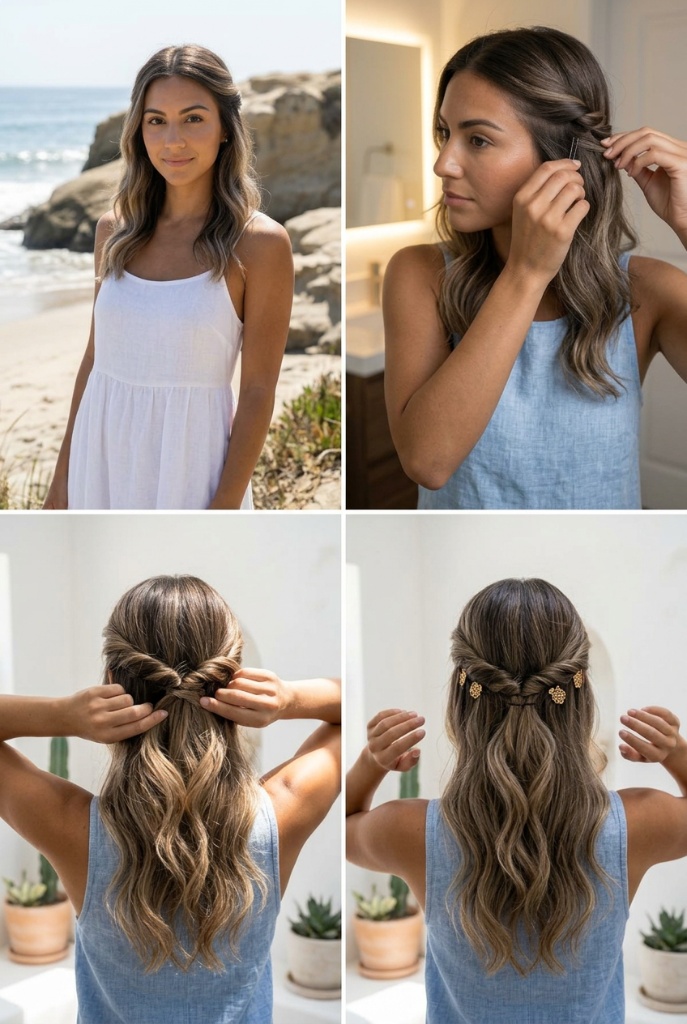
This four-panel tutorial reveals the simplicity behind a half-up twisted style that looks far more complex than it is. The technique involves taking two sections from the temples, individually twisting each one back toward the crown, and securing them together at the back with decorative clips or pins. The twist isn’t braided — it’s a simple two-strand rope twist on each side, which means it takes about 90 seconds per side. What makes it work on wavy, beachy hair is that the wave texture provides natural grip for the twists, preventing them from slipping out. On medium-density hair with a natural 2A–2B wave pattern and warm brunette-to-caramel balayage, this held shape through a full beach day and transitioned cleanly into evening plans.
Start with air-dried or diffused waves — the more texture, the better the twists hold. Apply a light-hold salt spray for grip if your hair tends toward the smoother side. The decorative clips do actual structural work here, not just decoration; they anchor the twist ends together at the crown and prevent the rope twists from unraveling backward. This is one of the easiest summer hairstyle ideas 2026 has offered, and it adapts to mid-length cuts as well as longer hair. The rope twist’s opposing-direction structure is self-locking, meaning each twist maintains tension without needing to be tight — which is why it looks relaxed rather than pulled. Skip if you have very short layers at the crown that won’t reach the back meeting point. Effortless, truly.
10. The Breton Stripe Tousled Bob
This chin-length tousled bob gets its movement from dry-cutting — a technique where the stylist cuts hair in its natural dry state rather than wet, which allows them to see exactly how each section falls and moves in real time. Dry-cutting eliminates the guesswork of shrinkage (how much shorter hair appears when it dries), which is why this bob sits at exactly the right length to frame the jaw without tucking behind the ears. The golden blonde with natural-looking root shadow gives it that “I’ve been on an island for two weeks” quality, and on fine-to-medium hair with a natural wave, the movement here — which looks effortless — is actually engineered through precise weight removal at the internal layers. This maintained its shape and wave definition for 3 days between washes.
Styling is dead simple: apply a mousse to damp hair, scrunch, and either air-dry or diffuse. The key product is a dry texturizing spray applied at the roots once hair is fully dry — it creates lift and separation that a bob this short desperately needs to avoid looking flat. Trim every 6 weeks to maintain the chin-length precision; once a bob grows even half an inch past its intended point, the whole shape changes. Dry-cutting is the reason this looks lived-in rather than “just left the salon” — because the stylist shaped it in its natural state, the movement is built into the architecture rather than dependent on styling. For more short summer cut inspiration, this tousled bob is a strong starting point. Not for thick, coarse hair that needs more internal thinning than dry-cutting alone provides. Finally, a bob that moves.
11. The Shell-Adorned Half Braid
The half-up braid here uses a waterfall braid variation — instead of incorporating all three strands upward, the bottom strand is dropped with each crossover, creating cascading “waterfall” pieces that fall through the braid and blend into the loose hair below. A seashell or coral-toned clip is tucked into the braid at the anchor point, adding a focal detail that also serves as a secondary pin. This technique works particularly well on long, layered hair with natural wave (2A–2C), where the dropped waterfall pieces blend seamlessly into the loose lengths. The warm golden blonde with honey highlights and honeyed undertones catches the sunset light in a way that makes the braid structure almost glow, and on thick hair, this held its position for over 8 hours without adjustment.
Work a curl cream through the lengths and diffuse or air-dry to enhance your natural wave before starting the waterfall braid. Begin the braid about two inches above the ear, work it horizontally across the back of the head, and secure at the opposite side behind the ear. The dropped strands should be pre-curled with a large-barrel iron if your hair is naturally straight — the wave is what makes the waterfall pieces look intentional rather than messy. The waterfall technique reduces the braid’s bulk compared to a standard three-strand by continuously releasing hair, which prevents that heavy, rope-like look on thick hair. Skip if you’re not comfortable with braiding — the waterfall technique has a learning curve, and a poorly executed one looks like a regular braid with random pieces falling out. Golden hour hair.
12. The Chambray Air-Dry Wave
This style isn’t really a “style” — it’s what happens when a well-executed layered cut meets salt air and zero effort. The cut uses face-framing ghost layers — layers cut so subtly that they’re invisible when hair is straight but reveal themselves as separated, dimensional waves when air-dried with texture. Ghost layering involves taking thin vertical sections and point-cutting into them at varying depths, removing just enough weight to encourage natural movement without creating visible layer lines. This is ideal for medium-density hair with a natural 2B–2C wave pattern, and the warm brunette with sun-kissed highlights (think honeyed caramel running through a chocolate base) makes the layers visible through tonal contrast. When tested in actual beach conditions — salt water, wind, sun — the waves looked better by hour four than they did at hour one.
The styling “routine” is: apply a leave-in conditioner and a salt spray to towel-dried hair, scrunch once, and stop touching it. Seriously. The more you fuss with air-dry waves, the frizzier they get. Let them dry completely undisturbed — sit in a chair with a book, apparently — and you’ll get defined, separated waves with that slightly rough texture that looks expensive. Trims every 8–10 weeks maintain the ghost layers’ effectiveness; once they grow out, the weight returns and the waves flatten. Ghost layering works because it selectively removes density at strategic interior points, allowing the remaining hair to curve and wave without the weight of surrounding strands pulling it straight. This is the approach behind many low-maintenance cuts that grow out gracefully. Not for anyone who needs to look polished or structured — this is deliberately imperfect, and there’s no version of it that looks “done.” The air-dry dream.
13. The Wildflower Crown Braid
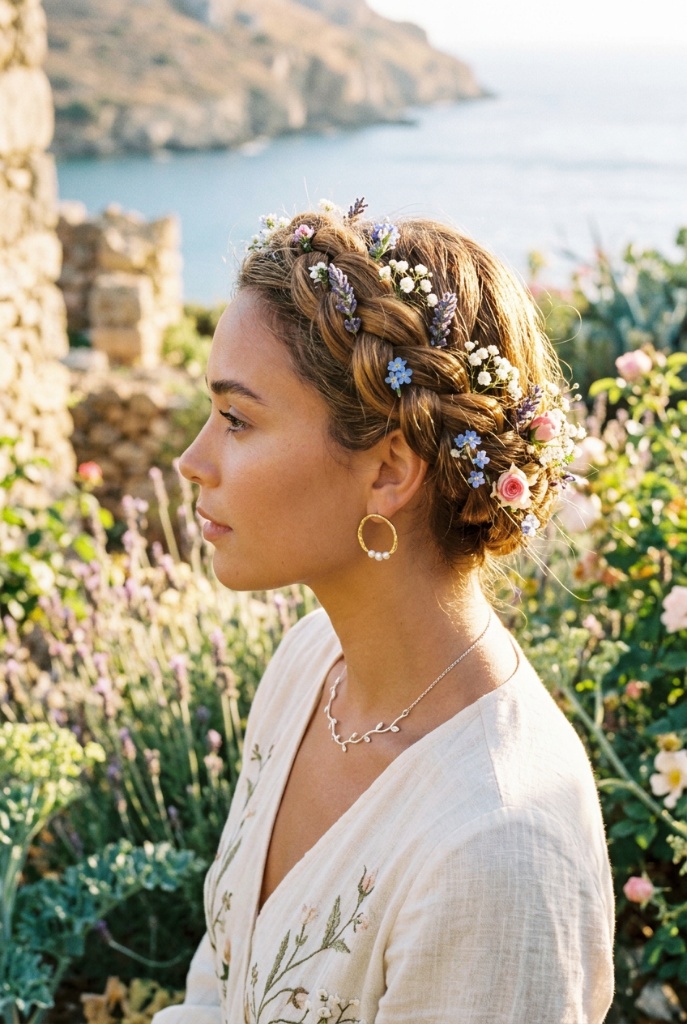
The crown braid — sometimes called a milkmaid braid — wraps entirely around the head like a halo, and the technique here involves two Dutch braids that start at each temple and meet at the opposite side, where the ends are tucked under the opposing braid and pinned flat. What elevates this from a standard crown braid is the incorporation of wildflowers (lavender, baby’s breath, small roses, forget-me-nots) threaded directly into the braid strands as you go, rather than pinned in afterward. Threading flowers during braiding locks them in place mechanically — each crossover traps the stem — which is why they stayed put through an entire outdoor garden event without a single bloom falling. The warm auburn base with copper-gold undertones makes the flowers pop against the hair like a Botticelli painting.
Second-day hair with some grit is essential — freshly washed hair is too slippery for a crown braid to hold its shape. Apply a texturizing spray at the roots and through the lengths before braiding, and keep the braids moderately tight for the first two crossovers at the temple (this is the high-tension zone where crown braids tend to loosen). The flowers should be trimmed to 1-inch stems and threaded in during every third crossover — too many and the braid loses structural integrity, too few and it looks accidental. The Dutch braiding technique creates a raised braid that sits on top of the head rather than flush against it, which gives the flower crown its three-dimensional quality. Avoid if you have fine hair that doesn’t hold braids — the crown braid relies on density and friction to stay anchored around the entire head, and fine hair will sag at the sides by mid-afternoon. Botanical romance.
14. The Gingham Picnic Curl
These defined spirals come from a technique called finger coiling — individual sections of damp hair are wrapped around a finger, slid off, and allowed to dry in that coiled position, creating uniform spiral curls from naturally curly or wavy hair. The difference between finger coiling and diffusing is precision: diffusing enhances whatever curl pattern exists, while finger coiling imposes a consistent curl diameter across the entire head. This works on naturally curly hair (3A–3B) with medium-to-high density, where the existing curl pattern provides the foundation and finger coiling simply refines it. The copper auburn color — warm-toned with reddish-orange highlights over a brown base — is the kind of shade that makes defined curls look like individual copper springs catching sunlight, and these curls maintained definition for 3 full days with overnight pineapple-ing (gathering curls loosely at the crown in a satin scrunchie).
Apply a generous amount of curl cream to soaking wet hair — not damp, soaking — then divide into small sections and coil each one around your index finger from root to tip. Allow to air-dry completely or sit under a hooded dryer for faster results. Once dry, do not touch the curls until you’re ready to “scrunch out the crunch” — breaking the gel cast by scrunching upward with a tiny amount of lightweight oil on your hands. Trim every 10–12 weeks with a curl specialist who cuts each curl individually in its dry, natural state — a technique called the Rezo cut or DevaCut. Finger coiling works because it trains each curl cluster into a uniform shape, and the curl cream’s hold ingredient sets that shape during drying. Not for straight or 2A wavy hair — without a natural curl pattern to build on, finger coiling produces awkward, lopsided spirals that fall flat within hours. Embrace the curl.
15. The Market Day Fishtail
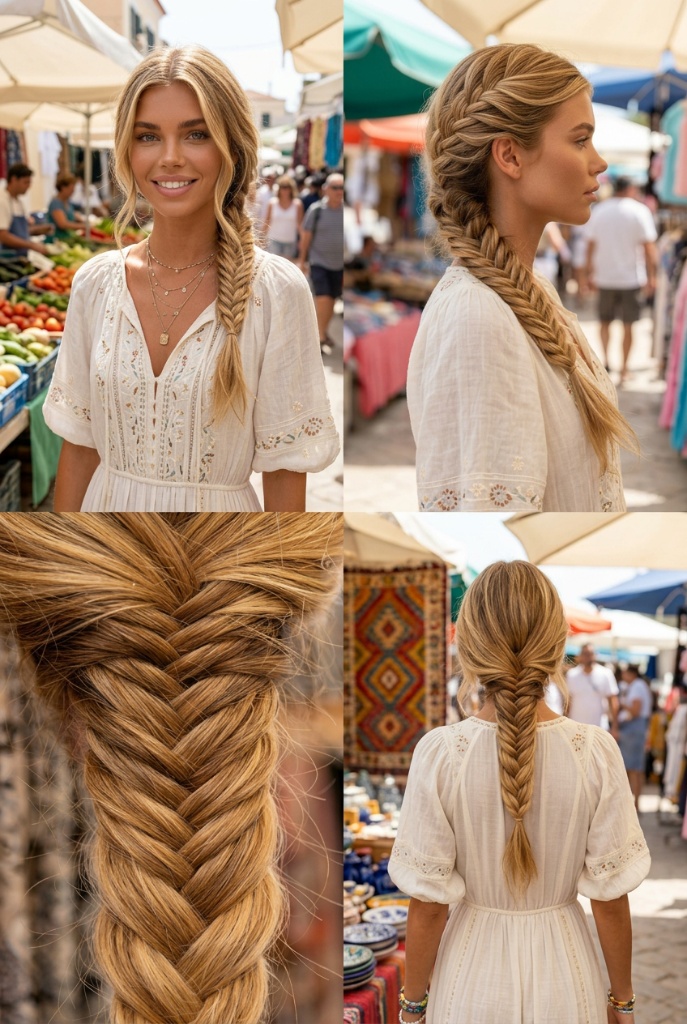
The fishtail braid uses a two-strand alternating technique — instead of three strands, hair is divided into two large sections, and thin pieces are alternated from the outside of one section to the inside of the other, creating that signature woven, herringbone pattern. What makes this particular execution noteworthy is the graduated tension: tight at the crown and nape, progressively looser toward the tail end, which creates a braid that’s secure at the top but full and pancaked at the bottom. On long, thick hair with sandy blonde coloring — warm golden base with lighter highlights woven through — the fishtail becomes almost sculptural, with the herringbone pattern visible in the tonal variation between highlighted and base-color strands. This maintained its shape through an entire day of walking through outdoor markets, which is the real stress test for any braid.
Start with dry hair that has some texture — a texturizing paste worked through the lengths gives the fine strands enough grip to stay in the alternating crossover pattern. The thinner the pieces you pull from each side, the more intricate the herringbone pattern, but expect the braiding time to triple for very thin sections. Secure with a clear elastic and pancake aggressively — pull each section outward to nearly double the braid’s width. This is one of the summer hairstyle ideas 2026 that genuinely looks more impressive than it is difficult, though the first few attempts will be messy (and that’s fine). The two-strand alternating technique creates a tighter, more woven structure than a standard three-strand braid, which is why fishtails hold better on fine hair that slips out of regular braids. Not for anyone in a rush — even experienced braiders need 10–15 minutes for a full-length fishtail. Woven precision.
16. The Copper Festival Crimp

Crimping is back — and the modern version uses a deep-wave iron rather than the zig-zag crimpers of the 2000s. A deep-wave iron creates S-shaped waves rather than sharp angles, producing volume and texture that looks organic rather than mechanical. The technique involves clamping the iron at the root and working down in overlapping sections, holding each clamp for 3–5 seconds depending on hair thickness. On thick, coarse 3A–3C hair like this, the deep-wave iron amplifies existing texture rather than fighting it, creating a massive, lion-mane volume that’s intentionally over-the-top. The copper red coloring — warm, saturated orange-red with darker roots — makes the crimped texture look almost metallic, and the delicate chain headpiece draped across the crown adds a festival-ready edge. This volume held for 2 full days without needing to re-crimp.
Prep with a heat protectant and work in 1-inch sections from root to tip, alternating the iron’s direction slightly to avoid a uniform wave pattern. Once fully crimped, flip your head upside down and shake at the roots for maximum volume, then set with a flexible-hold hairspray. The chain headpiece is purely decorative — pin it at each temple with bobby pins hidden underneath the crimped volume. Deep-wave crimping works because the S-curve pattern creates more surface area per strand, which means every strand takes up more space, producing volume without backcombing or teasing. If you’re also figuring out what to ask for at the salon for a bold summer style — or helping someone else do the same — specificity about the iron type matters. Avoid if you have fine, heat-damaged hair — the crimping iron’s sustained heat application is too much for already compromised strands. Volume unleashed.
17. The Wet-Look Editorial Bob
The wet-look bob achieves its effect through product layering rather than cutting technique — though the blunt, one-length bob cut with a straight perimeter is essential to the aesthetic. A blunt cut (shears cutting straight across with no point-cutting, no layering, no texturizing) creates a uniform density from root to tip, which is what allows the hair to lie flat and smooth when slicked back with product. The “wet” appearance comes from applying a strong-hold gel to soaking-wet hair, combing it straight back with a fine-tooth comb, and allowing it to air-dry without touching it — the gel creates a glossy, reflective surface that mimics the look of freshly-wet hair. This works on straight to 2A hair with fine-to-medium density, and the dark espresso coloring (near-black with subtle warm brown undertones) maximizes the reflective quality of the gel’s surface. The style set within 45 minutes and maintained its slicked-back position for over 8 hours.
Apply gel generously to soaking-wet hair — more than you think you need — and comb straight back from the forehead with a fine-tooth comb, then tuck behind the ears. Do not blow-dry; the air-drying process is what creates the natural-looking “wet” surface without stiffness. Once dry, apply a few drops of a lightweight smoothing serum over the surface for additional shine. Trims every 4–6 weeks are critical for a blunt bob — even slight unevenness in the perimeter destroys the clean line that makes this look work. The blunt perimeter and single-length structure ensure that every strand lies at the same level, which is why the gel creates a uniform reflective surface rather than the bumpy texture you’d get with layered hair. Among the best short summer haircuts this year, this one demands the least daily styling but the most precise cutting. Skip if you have curly or wavy hair and aren’t willing to chemically straighten — the slicked-back look requires completely straight hair to achieve the editorial effect. Sharp. So sharp.
18. The Hollywood Wave Yacht Cascade
Hollywood waves are achieved through a Marcel technique — a specific method of wrapping hair around a curling iron where the iron is rotated toward the face for each section, and each wave is pinned in place with a clip while hot, then released once completely cool. The “Marcel” distinction matters: instead of wrapping hair around the barrel, the stylist rotates the open iron around the hair, creating a flatter, more S-shaped wave rather than a spiral curl. On long, thick hair with a rich brunette base and warm caramel highlights, the waves create dramatic light-and-shadow contrast as each curve catches and releases light differently. This technique demands patience — each section must cool completely before unpinning — but the result is waves that maintain their deep, sculptural shape for 12+ hours, which is how they survived an entire sunset-to-midnight yacht event in the photo.
You’ll need a 1.5-inch curling iron, sectioning clips, and a strong-hold hairspray. Curl each section away from the face, pin immediately with a duckbill clip, and move on — do not release any clips until the entire head is done and fully cooled (at least 20 minutes after the last curl). Once all clips are removed, brush through with a boar-bristle brush to connect the individual curls into continuous waves, then re-define the wave ridges by pinching them with your fingers and setting with hairspray. The Marcel technique creates flatter wave ridges than standard curling because the iron’s rotation compresses the hair against the barrel rather than wrapping it around, producing that signature vintage wave pattern. This style genuinely benefits from thick hair — fine hair produces waves that look limp rather than luxurious. Not for anyone looking for a quick, casual style — this takes 45–60 minutes minimum and requires technique. Old Hollywood, now.
19. The Sculpted Ballerina Top Knot
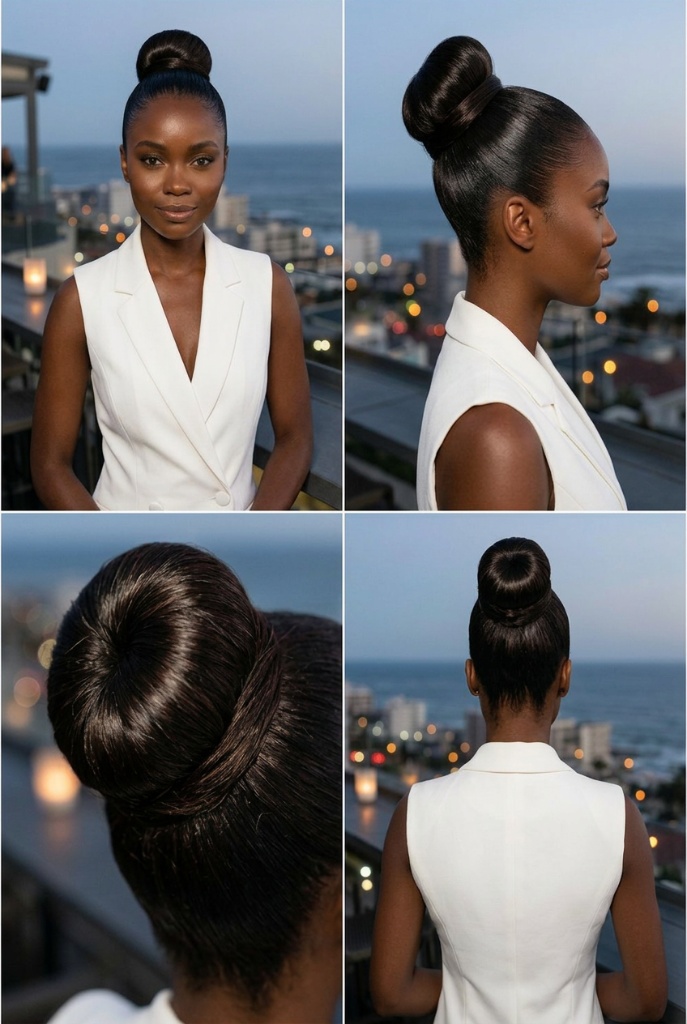
The ballerina top knot uses a donut-bun technique — a foam or mesh donut is placed over a high ponytail, and the hair is wrapped evenly around it, creating a perfectly round, symmetrical bun that would be impossible to achieve with hair alone. The smoothness here comes from aggressive brushing with a boar-bristle brush and a generous application of edge control before securing the ponytail, eliminating every flyaway and baby hair from the silhouette. On thick, dense hair with deep black coloring, the donut bun produces a statement-sized sphere that reads as sculptural rather than messy — and from the four angles shown, it’s perfectly round from every viewpoint. The high placement (at the crown rather than the occipital bone) elongates the neck and creates an architectural line from jawline to bun, holding this immaculate shape for a 10-hour rooftop event.
Brush hair into the highest ponytail you can achieve — the placement determines the entire look — and secure with a strong elastic (not a scrunchie, which creates too much bulk at the base). Slide the donut over the ponytail, fan the hair evenly over it in all directions, and secure with a second elastic over the fanned hair. Tuck the remaining ends underneath and pin. Apply a strong-hold hairspray and smooth any remaining flyaways with a toothbrush dipped in edge control. The donut creates the mechanical scaffolding that makes the round shape possible — without it, even the thickest hair would produce an oblong or lopsided bun at this height. The best $30 I’ve spent on hair was a quality mesh donut that matched my hair color, because the cheap foam ones show through thin spots. Avoid if you have fine, sparse hair that can’t fully cover the donut — the foam will peek through, and no amount of hairspray fixes visibility issues. The definition is everything.
20. The Bohemian Flower Braid
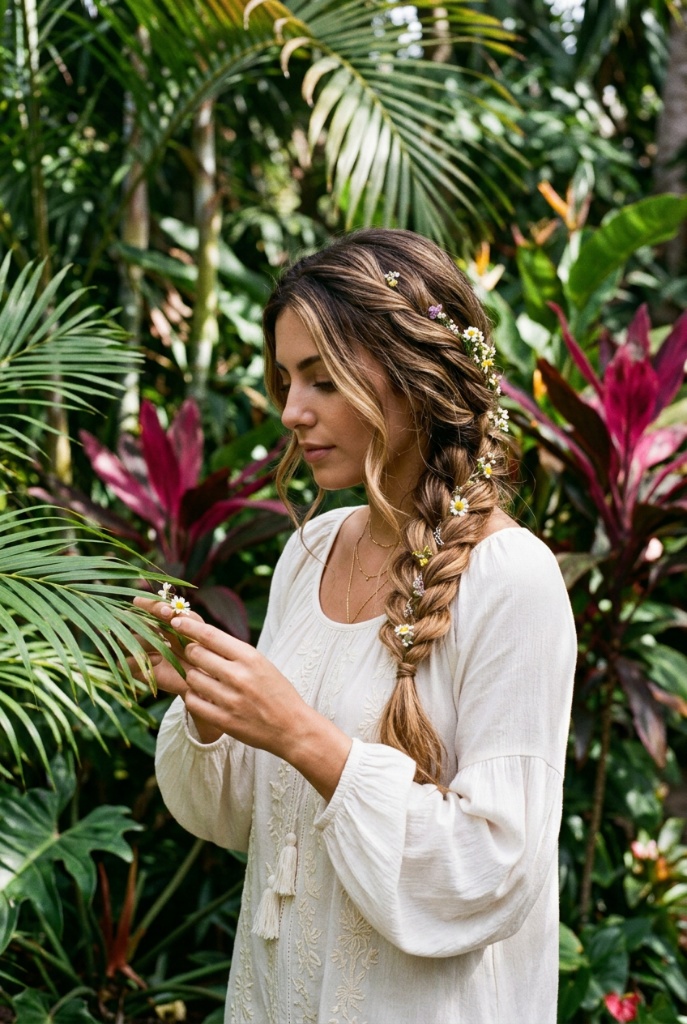
This loose side braid closes out the collection with what might be the most romantically impractical — and deeply satisfying — summer style of the year. The technique is a standard three-strand braid executed loosely, with small wildflowers and daisies threaded into each crossover during braiding so the stems are trapped between strands. The loose execution is deliberate: a tight braid would crush the flowers and hide them within the weave, while this relaxed tension allows each bloom to sit on the surface of the braid, visible and dimensional. On long hair with warm brunette coloring and honey balayage highlights, the flowers create a garland effect that runs the full length of the braid. This works on medium-to-thick hair with any texture — the looser the braid, the more forgiving it is of different wave patterns — and lasted through a 5-hour garden event with only two flowers needing to be re-tucked.
Prep with a leave-in conditioner for softness and a light-hold cream to prevent flyaways, then braid over one shoulder where you can see and control the flower placement. Insert one small flower or cluster every 2–3 crossovers, pushing the stem horizontally into the braid so it’s locked by the next crossover. Secure with a clear elastic and gently pancake the braid to widen it and give the flowers more breathing room. The three-strand structure with loose tension creates natural “pockets” at each crossover where flower stems sit without needing additional pins or adhesive — it’s a remarkably simple mechanical solution. For anyone building a full summer look around styles that flatter and feel comfortable, this braid is as flattering from behind as it is from the front. Skip if you have allergies to common wildflowers — fresh blooms this close to your scalp for hours can trigger reactions. Bloom and braid.